Fixing a broken pot.
Sooner or later you may need to Fix Cracked or Broken Flower Pot.
Over time it is possible to collect quite a few pots and some of them may be treasured and valuable.
Accidents will happen and its inevitable that a nice pot will be cracked or broken.
But don’t despair. It’s not too much trouble to mend a broken pot given the right tools and materials and procedure.
For our purposes we will be working on a pot with a rather large crack that goes in several directions but the methods here should work for almost any pot.
Most of the tools needed are found around the house but you may need to borrow a neighbors electric drill if you do not have one.
Tools needed:
• Electric drill to drill holes in pot.
• Masonry bit a bit larger than the wire.
• Hand pump squirt bottle filled with water.
• Vise grip type pliers.
• Cutting pliers to cut wire.
• Chalk to mark the end of the crack.
Materials:
• Wire to wrap pot
Step 1 – Get Started!
Find a suitable place to work.
If you are fixing a 12 inch pot you could do it on the kitchen table, but you would probably want to do a large pot out of doors.
A lawn is a perfectly suitable place to repair larger containers because the pot can be safely tipped on its side for ease of drilling.
Directions short and sweet:
• Find ends of crack or cracks and drill relief holes.
• Drill a hole on each side of the crack.
• Run wire around the pot crossing over to the hole on the opposite side and push 4 to 6 inches of wire through holes.
• Carefully twist the wires inside the pot.
• Trim wires, and pat self on back for saving money by repairing an expensive pot.
Step 2
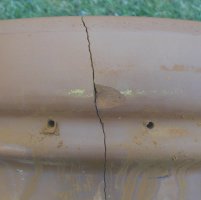
Examine the crack and determine where it starts and where it ends.
A large crack is easy to find but you may need to look very closely to see where the crack ends.
One way to find the end of the crack is to spray some water on the crack and then wipe it away with your hand. Look for hair line cracks.
Once you find the end of the crack mark it with chalk.
Step 3
Drill small relief holes to stop the crack. This a an old trick used by windshield repair men. If a hole is drilled at the end of the crack it often can stop the crack from running further.
It is important to place the hole at the very end of the crack so look carefully.
A 1/4 inch hole should do the trick.

Drill the holes at the very end of the cracks.
Make sure to locate all the cracks.
Drilling slow and steady using light pressure is the key to not breaking the pot.
In either care a masonry bit is used. This type of bit is different than a regular twist drill that is used to drill wood or metal.
The masonry bit will have a tip of carbide, which is a very hard metal and drills by scraping the material away.
If you are not experience in this type of work if might be a good idea to practice for a few minutes on a broken piece before you start on an expensive pot.
Step 4
Now drill holes for the wire.
Try to determine where you will wrap the wire.
In this case there was a bit of a rim so we decided to use this feature to help hold the wire in place.
Drill holes on both sides of the crack using a carbide drill that is just a little bit bigger than the wire. Larger holes make it easy to put the wire thought and allows a little leeway when we tighten the whole thing up.
For this pot we drilled holes about 1-1/2 inches from the crack and we wired it in one spot only.
You may want to drill several holes along length of the crack.
Step 5
wire the pot together .
Copper wire seems to work well because its soft and easy to work with.
Any good hardware store will have a selection of copper wire.
Look for un-insulated ground wire.
It’s a little expensive so from now on when you go to the store and see they are selling a 5 foot cut off piece of copper wire for a buck, buy it and keep it for jobs like this.
Try to use some common sense as to the wire size.
You want it to be big enough to do the job but not so big that it is hard to work with.
Be careful when threading the wire thought the holes.
Too much pressure could cause the pot to break.
Make sure you have enough wire on the inside of the pot to twist together. We allowed about 6 inches.
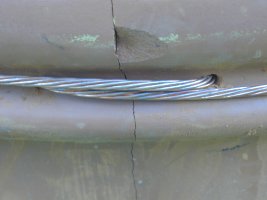
Stranded wire is easy to bend and conforms well.
The idea is to run the wire around the pot and cross over to the hole on the opposite side the crack.
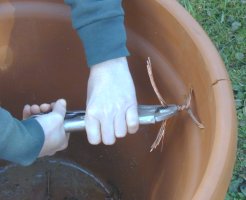
Then clamp the vise grip pliers on to the spiral and slowly twist the wires tighter.
Be very careful to apply slow steady pressure so that you don’t break the pot while twisting.
After the whole thing is tight its time to trim the ends and carefully bend the wire down into the pot.
And that’s it.
The pot is now ready for use
, but you probably will want to be careful with this one from now on.
Obviously letting the crack fill with water and freezing or leaving the pot out all winter with soil inside is a no no with any pot.
As a option you might want to put a bit of block bond or some type of cement patch on the inside to help stabilize the cracked sections.
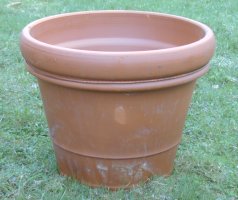
OK here is the best part.

If you can see the price tag you will notice
that this really nice terra cotta pot was
marked down from $69.97 to TEN CENTS!